
自定义页眉允许网站所有者为网站上传自己的"页眉"图像,可以放在某些页面的顶部。用户可以通过管理面板上的外观>页眉部分的可视化编辑器对这些图片进行自定义和裁剪。也可以在页眉下面或上面放置文本。为了支持流体布局和响应式设计,这些页眉也可以是灵活的。使用get_custom_header()可以将页眉放入主题中,但必须首先使用add_theme_support()将其添加到你的 functions.php 文件中。自定义页眉是可选的。
要设置一个基本的、灵活的、带有文本的自定义页眉,你需要包括以下代码:
function themename_custom_header_setup() {
    $args = array(
        'default-image'      => get_template_directory_uri() . 'img/default-image.jpg',
        'default-text-color' => '000',
        'width'              => 1000,
        'height'             => 250,
        'flex-width'         => true,
        'flex-height'        => true,
    );
    add_theme_support( 'custom-header', $args );
}
add_action( 'after_setup_theme', 'themename_custom_header_setup' );
after_setup_theme钩子的作用是为了让自定义页眉在主题加载后注册。
什么是自定义页眉
当你在主题中启用自定义页眉时,用户可以使用WordPress主题定制器改变他们的页眉图片。这使用户对他们网站的外观有更多的控制和灵活性。
给主题添加自定义页眉的支持
要在主题中开启自定义页眉,把下面的代码添加到functions.php文件:
add_theme_support( 'custom-header' );
当启用自定义页眉时,你可以通过向add_theme_support()函数传递参数来配置其他几个选项。
可以使用一个数组向add_theme_support函数传递特定的配置选项:
function themename_custom_header_setup() {
    $defaults = array(
        // Default Header Image to display
        'default-image'         => get_template_directory_uri() . '/images/headers/default.jpg',
        // Display the header text along with the image
        'header-text'           => false,
        // Header text color default
        'default-text-color'        => '000',
        // Header image width (in pixels)
        'width'             => 1000,
        // Header image height (in pixels)
        'height'            => 198,
        // Header image random rotation default
        'random-default'        => false,
        // Enable upload of image file in admin
        'uploads'       => false,
        // function to be called in theme head section
        'wp-head-callback'      => 'wphead_cb',
        //  function to be called in preview page head section
        'admin-head-callback'       => 'adminhead_cb',
        // function to produce preview markup in the admin screen
        'admin-preview-callback'    => 'adminpreview_cb',
        );
}
add_action( 'after_setup_theme', 'themename_custom_header_setup' );
灵活的页眉图像
如果数组中不包括flex-height或flex-width,高度和宽度将是固定尺寸。如果包含了flex-height和flex-width,高度和宽度将被用作建议尺寸。
页眉文本
默认情况下,用户可以选择是否在图片上显示页眉文本。没有选项可以强迫用户使用页眉文本,但如果你想完全删除页眉文本,可以在参数中把'header-text'设置为'false'。这将删除页眉文本和切换它的选项。
示例
设置自定义页眉图片
当用户第一次安装主题时,你可以引入默认的页眉图片,在他们选择自己的页眉图片之前,会被选中。这可以让用户更快地设置主题,并使用你的默认图片,直到他们准备好上传自己的图片。
设置默认页眉图片宽980px,高60px
$header_info = array(
    'width'         => 980,
    'height'        => 60,
    'default-image' => get_template_directory_uri() . '/images/sunset.jpg',
);
add_theme_support( 'custom-header', $header_info );

$header_images = array(
    'sunset' => array(
            'url'           => get_template_directory_uri() . '/images/sunset.jpg',
            'thumbnail_url' => get_template_directory_uri() . '/images/sunset_thumbnail.jpg',
            'description'   => 'Sunset',
    ),
    'flower' => array(
            'url'           => get_template_directory_uri() . '/images/flower.jpg',
            'thumbnail_url' => get_template_directory_uri() . '/images/flower_thumbnail.jpg',
            'description'   => 'Flower',
    ),
);
register_default_headers( $header_images );
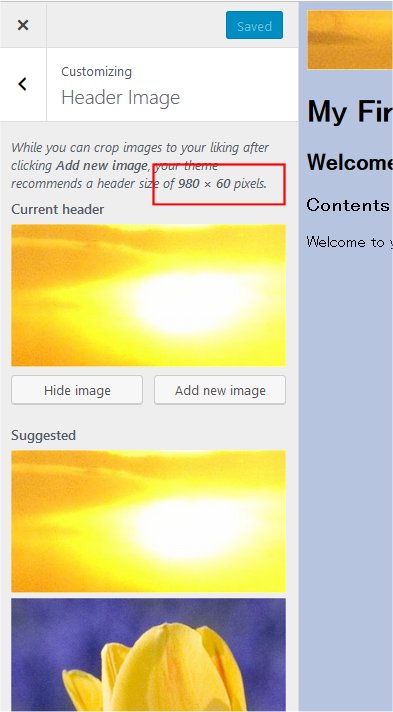
不要忘记调用register_default_headers()来注册一个默认图片。在这个例子中,sunset.jpg是默认图片,flower.jpg是定制器中的一个备选选择。
在管理界面,点击外观>页眉,在定制器中显示页眉图片菜单。注意,在add_theme_support()中指定的宽度和高度被显示为推荐尺寸,而flower.jpg被显示为可选择的选项。
使用灵活的页眉
默认情况下,用户将不得不裁剪他们上传的任何图片以适应你指定的宽度和高度。然而,你可以通过指定'flex-width'和'flex-height'为true,让用户上传任何高度和宽度的图片。这将让用户在上传新照片时跳过裁剪步骤。
设置灵活的页眉:
$args = array(
    'flex-width'    => true,
    'width'         => 980,
    'flex-height'   => true,
    'height'        => 200,
    'default-image' => get_template_directory_uri() . '/images/header.jpg',
);
add_theme_support( 'custom-header', $args );
更新header.php文件:
<img alt="" src="<?php header_image(); ?>" width="<?php echo absint( get_custom_header()->width ); ?>" height="<?php echo absint( get_custom_header()->height ); ?>">
显示自定义页眉
为了显示自定义页眉,函数get_header_image()检索页眉图片,get_custom_header()获得自定义页眉数据。
例如,下面展示了如何在主题中使用自定义页眉图片,代码被放入header.php文件。
<?php if ( get_header_image() ) : ?>
    <div id="site-header">
        <a href="<?php echo esc_url( home_url( '/' ) ); ?>" rel="home">
            <img src="<?php header_image(); ?>" width="<?php echo absint( get_custom_header()->width ); ?>" height="<?php echo absint( get_custom_header()->height ); ?>" alt="<?php echo esc_attr( get_bloginfo( 'name', 'display' ) ); ?>">
        </a>
    </div>
<?php endif; ?>
向后兼容
自定义页眉在WordPress 3.4及以上版本中被支持。如果你想让你的主题支持比3.4更早的WordPress,可以使用以下代码代替add_theme_support( 'custom-header')
global $wp_version;
if ( version_compare( $wp_version, '3.4', '>=' ) ) :
    add_theme_support( 'custom-header' );
else :
    add_custom_image_header( $wp_head_callback, $admin_head_callback );
endif;
函数参考
- header_image() 显示页眉图片URL
- get_header_image() 检索自定义页眉图片
- get_custom_header() 获取页眉图片数据
- get_random_header_image() 检索随机自定义页眉图片
- add_theme_support() 注册对某一特定功能的主题支持
- register_default_headers() 注册默认的页眉选项,以便由定制器显示